
How to Migrate from Mailchimp to beehiiv, Step by Step (2026)
Move your Mailchimp subscribers and past campaigns to beehiiv: export, clean, import, segment, rebuild forms and automations, and wind down Mailchimp safely.
Moving from Mailchimp to beehiiv comes down to two transfers and a short rebuild. You export your audience as a CSV and import it into beehiiv. Then beehiiv’s Content Import tool connects to your Mailchimp account and pulls in past campaigns as posts. Signup forms, automations, and your custom domain don’t transfer, so you set those up again in beehiiv.
This guide puts those steps in order. It’s based on beehiiv’s official Mailchimp migration guide (last updated Nov 21, 2025), beehiiv’s newer subscriber import guide (updated Oct 1, 2026), and Mailchimp’s help center, all checked on October 6, 2026.
How we researched this: We haven’t run a Mailchimp-to-beehiiv migration on our own accounts yet. Every step below comes from beehiiv’s and Mailchimp’s official documentation and public pricing pages. Menu names can change, so if a screen looks different, beehiiv’s help article is the source of truth.
About our links: beehiiv links on this page are affiliate links (/go/beehiiv). Mailchimp is linked directly; we don’t earn a commission from Mailchimp. Where we mention Kit as an alternative, that link is also affiliate (/go/kit). Our recommendations would be the same either way.
First: is beehiiv the right place to move?
beehiiv is built for newsletters: a publication website, unlimited sends, paid subscriptions, and an ad network. Mailchimp is a broader small-business marketing tool. Before you migrate, check that you aren’t leaving behind something you rely on:
- Store-connected automations (abandoned cart, post-purchase), SMS marketing, or transactional email are Mailchimp strengths. We didn’t find store-connected flows, SMS, or a separate transactional product on beehiiv’s pricing page. If those matter, Mailchimp may still be the better home. See our beehiiv vs Mailchimp comparison for the full breakdown.
- Want a creator email tool with deeper automation and no publication site? Kit is the other common destination. Kit’s pricing page lists a free migration service on its paid plans, where its in-house team rebuilds your forms, templates, and automations. See How to migrate from Mailchimp to Kit.
- The newsletter is the product, you send often, or you want to charge readers or sell sponsorships? That’s what beehiiv is built for. Keep reading.
The migration at a glance
- Take inventory of your Mailchimp account
- Pick a beehiiv plan sized for your list
- Export your audience from Mailchimp
- Clean the CSV
- Import subscribers into beehiiv
- Segment out unengaged subscribers for your first sends
- Create a default post template
- Import your past campaigns
- Rebuild signup forms
- Rebuild automations
- Connect your custom domain
- Send, check, and wind down Mailchimp
Step 1: Take inventory of your Mailchimp account
Write down what you have before you change anything. It takes a few minutes and keeps you from missing anything later:
- Audiences: how many, and how many subscribed contacts in each. beehiiv’s feature table lists 1 publication on Free, 3 on Lite, and 10 on Pro.
- Tags, groups, and audience fields you actually use for targeting
- Signup forms embedded on your website or elsewhere
- Automations and flows: which ones are live and what they send
- Campaign history: whether your campaigns were built in Mailchimp’s New Email Builder or the Legacy Email Builder (this decides what beehiiv can import; see Step 8)
- A custom sending domain, if you use one
- Integrations that add contacts to Mailchimp (your store, website, or lead-magnet tools)
Step 2: Pick a beehiiv plan sized for your list
beehiiv’s migration guide is marked for all plans, including Free. What you need depends on your list size and what you’re rebuilding:
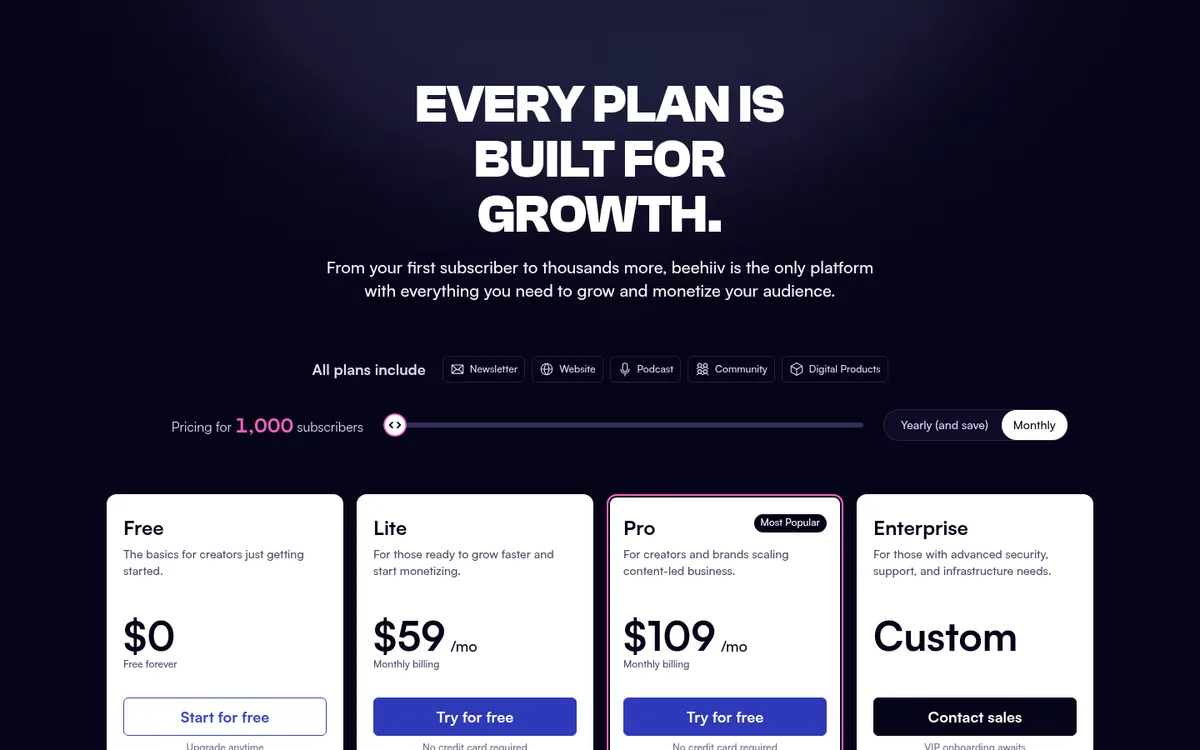
- Free: $0 forever, up to 2,500 subscribers, unlimited email sends, a website, and a welcome email. Free doesn’t include custom automations, custom domains, or paid subscriptions.
- Lite: adds 10 live custom automations, custom domains, paid subscriptions (beehiiv takes 0%; Stripe’s 2.9% + $0.30 still applies), and the referral program. Caps at 100,000 subscribers.
- Pro: unlimited live custom automations, removal of beehiiv branding, and up to 250,000 subscribers.
Here’s what beehiiv’s pricing page showed on October 6, 2026:
| Subscribers | Free | Lite (monthly / yearly) | Pro (monthly / yearly) |
|---|---|---|---|
| 1,000 | $0 | $59/mo / $49/mo | $109/mo / $95/mo |
| 2,500 | $0 | $79/mo / $69/mo | $149/mo / $129/mo |
| 5,000 | Not available | $109/mo / $95/mo | $199/mo / $169/mo |
| 10,000 | Not available | $139/mo / $119/mo | $239/mo / $199/mo |
Yearly prices are shown per month. beehiiv’s FAQ says yearly billing saves up to 20%, and that Lite and Pro include a free trial with no credit card required. beehiiv counts unique email addresses subscribed to your publication, so unsubscribed and cleaned Mailchimp contacts you leave behind don’t count.
Size your plan before you import. beehiiv’s import guide says that if an import would take you over your plan’s subscriber limit and you don’t upgrade, the whole import goes on hold, including subscribers who would have fit. Partial imports aren’t supported. Either upgrade first, or trim your CSV to fit. For every tier, see beehiiv pricing explained.
Step 3: Export your audience from Mailchimp
From Mailchimp’s View or Export Your Contacts help article:
- Click Audience. If you have more than one audience, choose the one you want from the Audience drop-down.
- Click Export audience.
- In the Export all contacts? pop-up, click Export CSV. Mailchimp emails you when the export is ready.
- Download the file. beehiiv’s guide points to the Audience exports page, where you click Download.
Things to know about the file:
- Only Owners and Admins can export audiences in Mailchimp.
- The export may be a ZIP file with separate CSVs for subscribed, unsubscribed, non-subscribed, and cleaned contacts. Unzip it first.
- Exports stay available in your Mailchimp account for 30 days, so save a copy somewhere permanent.
- The export includes your audience fields plus columns such as MEMBER_RATING (contact rating), OPTIN_TIME, CONFIRM_TIME, and TAGS. It does not include email engagement metrics like opens and clicks, signup source, or purchase history.
Repeat the export for each audience you’re moving.
Step 4: Clean the CSV
A little cleanup prevents most failed imports. Work only from the subscribed CSV:
- Don’t import unsubscribed or cleaned contacts. When you import, beehiiv asks you to confirm that everyone in the file knowingly opted in. Its import guide says a false claim violates beehiiv’s Terms of Service and Privacy Policy and can lead to termination of service.
- Check the email column header. beehiiv accepts
email,email address, oremailaddress. Its FAQ lists a missing or unsupported email header, blank email cells, and files not saved as CSV as the most common reasons a CSV is rejected. - Rename reserved fields. Some column names are reserved in beehiiv and can’t be imported as custom fields. beehiiv’s example: rename
citytoimported_city. - Keep
MEMBER_RATING. You’ll use it in Step 6 to hold back unengaged subscribers. - Keep
TAGSif you segment by tag. beehiiv can map a column to subscriber tags. If someone has several tags, they go in one cell without unescaped commas. - Keep the original signup date if you care about it. beehiiv sets each subscriber’s subscription date to the import date by default. Its Mailchimp guide says you can contact beehiiv support after the import and ask to have original signup dates added.
- Delete columns you won’t use. beehiiv suggests this for easier mapping.
Step 5: Import subscribers into beehiiv
beehiiv’s current subscriber import guide (updated Oct 1, 2026) describes a four-step flow. The older Mailchimp guide starts from Settings > Subscribers Import > New Subscribers Import, so the starting point may look slightly different in your account.
- Upload: go to Subscribers and click Import subscribers (you can also start from Settings). Choose Upload a CSV and select your file. beehiiv shows a preview of the rows and columns it found.
- Map fields: tick Import? for each column you want, then set its type. Your email column is Email address, values like first name or rating are Custom field (pick an existing field or click Create new custom field), and labels are Subscriber tag. The Overwrite existing custom field data toggle is on by default. When it’s on, a blank cell in your file deletes an existing subscriber’s value.
- Onboard (optional): enroll the batch in an automation, apply a tag to everyone (a tag like “Mailchimp import” makes this group easy to find later), or add them to newsletter lists (Pro and Enterprise only). Automations need a paid plan, and only live automations enroll anyone. Think twice before enrolling long-time subscribers in a “welcome” email.
- Review & confirm: check the subscriber count, which also shows how much room your plan has left. Click Start import, read the opt-in statements, and click I agree.
To check progress, go to Settings > Subscribers import and scroll to Historical imports. Each import shows a status (Queued, Processing, Completed, Failed, or On hold) and counts for Uploaded, Accepted, and Rejected. beehiiv automatically filters out duplicate, invalid, and inactive emails, which is why accepted can be lower than uploaded.
Step 6: Segment out unengaged subscribers for your first sends
A new sending platform plus a list with lots of inactive addresses is hard on deliverability. beehiiv recommends excluding unengaged subscribers from your first 2–4 weeks of sends, and says that ideally you’d remove them during migration. Its specific suggestion is to segment subscribers with a Mailchimp contact rating of 1 or 2.
Here’s what those ratings mean, from Mailchimp’s About Contact Ratings:
| Mailchimp rating | Meaning (per Mailchimp) |
|---|---|
| 1 star | Unsubscribed and resubscribed, or soft bounced in the past |
| 2 stars | No engagement: most likely a new contact, or a previously engaged contact who’s gone dormant |
| 3 stars | Low engagement: clicks some links |
| 4 stars | Moderate engagement: often clicks links |
| 5 stars | High engagement: clicks links very consistently |
Mailchimp bases ratings on clicks relative to how often you send, counting regular and A/B test emails only (not automations, ads, or landing pages). Every new contact starts at 2 stars. So a 2-star segment includes recent signups as well as dormant readers. If you have a lot of new subscribers, you might use OPTIN_TIME to bring recent signups back in sooner. That’s our suggestion, not beehiiv’s.
To exclude the segment, create it in beehiiv using the rating custom field you imported. Then, when you publish a post, open the Audience page of the Post Builder and select it under Excluded segments.
Step 7: Create a default post template
Do this before importing content. beehiiv applies your default post style to imported posts, and its guide warns that after migration, styling can only be changed post by post.
- Create a newsletter template in beehiiv with your fonts, colors, and header (beehiiv has pre-built templates to start from).
- Select Set as default post style.
Step 8: Import your past campaigns
From beehiiv’s Mailchimp guide:
- Go to Settings > Content Import and click Start Import.
- Choose Mailchimp and click Next.
- Click Connect and sign in to Mailchimp to authorize the connection.
- Under Select campaigns to import, choose All campaigns or Customized by campaign folders, then click Next.
- Wait. beehiiv says imports typically take 5–15 minutes. The Historical Imports table shows Pending or Processing; refresh until it shows Completed with the number of posts created.
Imported campaigns appear under Posts and on your beehiiv website. beehiiv links to a separate guide for backdating imported posts.
The main limitation: the importer supports campaigns built with Mailchimp’s New Email Builder (launched in 2022). Campaigns built with the Legacy Email Builder won’t import. You’d need to recreate any of those you want to keep by hand.
Step 9: Rebuild signup forms
Mailchimp embed codes on your website will keep sending signups to Mailchimp until you replace them. Switch them early so new subscribers land in beehiiv.
From beehiiv’s embedded subscribe form guide (all plans):
- Go to Subscribers > Subscribe forms and click Create new form.
- Design it, publish it, and copy the embed code.
- Replace the Mailchimp form on your website with the beehiiv embed.
Embedded forms are meant for external sites. Your beehiiv website has its own subscribe page. On paid plans, the Email submitted trigger can start an automation when someone fills in a form, which is how you’d rebuild a lead-magnet delivery flow.
Step 10: Rebuild automations
Mailchimp automations don’t transfer. beehiiv’s guide says to recreate them with beehiiv Automations.
- Plan limits: Free includes a welcome email but no custom automations. Lite allows 10 live custom automations, and Pro is unlimited. beehiiv’s automation guide marks automations as a paid-plan feature.
- How they’re built: every automation needs at least one trigger and one action. You can add delays, tags, and branches.
- Templates to start from: beehiiv’s Quick start templates include Welcome email (with re-entry), Lead magnet automation, and a Re-engagement automation flow (90-day inactivity). That last one sends 3 emails over 3 days, then removes unengaged subscribers.
A practical way to work: list each live Mailchimp automation from Step 1, decide whether you still need it, and rebuild the ones you do. If you depend on store-triggered flows like abandoned carts, re-read the first section of this guide. We didn’t find those in beehiiv’s feature table or template list.
Step 11: Connect your custom domain
If you sent from a custom domain in Mailchimp, beehiiv’s migration guide says you can add it in beehiiv. From beehiiv’s custom domain guide (updated Oct 1, 2026):
- Custom domains are available on paid plans (Lite and up).
- You can set up a web domain (for your beehiiv website), an email sending domain, or both, under Settings > Domains.
- Setup runs through Entri (guided) or manually. beehiiv generates the 12 DNS records to add, and recommends a subdomain for your web domain.
- Verification can take up to 72 hours. Don’t remove and re-add records while you wait.
- Using Cloudflare? beehiiv can’t detect proxied records. Set each beehiiv record to DNS only.
Step 12: Send, check, and wind down Mailchimp
- Send your first issues to your engaged segment (Step 6), and consider telling readers you’ve moved and why. Bring the excluded group back in gradually after the first few weeks.
- Catch late signups. If anyone joined through Mailchimp after your export (before you swapped the forms), export those contacts and import them too. beehiiv filters out duplicates.
- Keep your exports. Mailchimp keeps exports for only 30 days, so store your CSVs yourself.
- Decide what to do with the Mailchimp account. From Mailchimp’s Pause or Cancel Your Account and Change or Pause Your Marketing Plan help articles:
- Pause a paid Marketing plan for 3 or 6 months (up to 2 pauses every 12 months). Your data is kept, and billing resumes automatically when the pause ends.
- Downgrade to Free. You can do this only once over the life of an account, and it takes effect at the start of your next billing cycle. Mailchimp Free allows up to 250 contacts; above that, Mailchimp puts a hold on sending.
- Delete the account. This is permanent: Mailchimp removes all audience data, campaign archives, and reports, and you must pay any outstanding balance first. Mailchimp says to back up your data before deleting.
Many people pause first, confirm everything works on beehiiv, and only then delete. That’s a cautious approach, not a vendor requirement.
What doesn’t carry over
- Legacy Email Builder campaigns (only New Email Builder campaigns import)
- Automations (rebuild them in beehiiv Automations)
- Signup forms and embed codes (create beehiiv forms and replace the embeds)
- Original signup dates, by default (beehiiv support can add them on request)
- Open and click history (Mailchimp’s contact export doesn’t include engagement metrics; the contact rating is a summary)
- Unsubscribed and cleaned contacts (they shouldn’t be imported as active subscribers)
- Store, SMS, and transactional features (beehiiv’s pricing page doesn’t list equivalents)
Need help?
beehiiv points to its beehiiv Experts Directory, where third-party specialists offer paid migration services. If you’re still deciding between platforms, our Best newsletter platform for beginners guide compares the main options. Moving from Substack or Kit instead? See How to migrate from Substack to beehiiv or How to migrate from Kit to beehiiv.
Start your beehiiv account · Compare beehiiv vs Mailchimp first
What we’ll add after hands-on testing
Once we’ve run a Mailchimp-to-beehiiv migration on real accounts, we’ll update this guide with:
- Screenshots of the export, import, and Content Import screens from those accounts
- How long a real subscriber import and campaign import took
- Notes on what imported campaigns looked like in beehiiv’s editor
Until then, treat this as a step-by-step map built from official documentation, not a first-hand report.
Sources
All checked October 6, 2026.
- beehiiv: How to migrate from Mailchimp to beehiiv (help article, updated Nov 21, 2025; all plans)
- beehiiv: How to import free subscribers and map custom fields or tags (updated Oct 1, 2026; import steps, opt-in confirmation, header and reserved-field rules, on-hold imports, import statuses)
- beehiiv: Pricing (Free / Lite / Pro prices at 1,000, 2,500, 5,000, and 10,000 subscribers on monthly and yearly billing; feature comparison table; FAQ on unlimited sends, subscriber counting, free trials, yearly savings, and 0% take)
- beehiiv: How to use a custom domain for your publication (updated Oct 1, 2026)
- beehiiv: Creating an embedded subscribe form (updated Jul 27, 2026)
- beehiiv: Types of workflows: How to create automations for your subscribers (updated Oct 2, 2026)
- Mailchimp: View or Export Your Contacts (export steps, ZIP contents, 30-day availability, included and excluded data)
- Mailchimp: About Contact Ratings (star rating meanings and how ratings are calculated)
- Mailchimp: About Mailchimp pricing plans (Free plan contact and send limits, sending hold)
- Mailchimp: Pause or Cancel Your Account and Change or Pause Your Marketing Plan (pause limits, one-time downgrade to Free, permanent deletion)
- Kit: Pricing (free migration service on paid plans)
- Related AudienceBench guides: beehiiv vs Mailchimp, Migrate Mailchimp to Kit, beehiiv pricing explained, Migrate Substack to beehiiv, Best newsletter platform for beginners